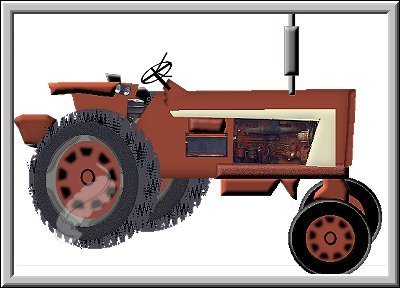
Tractor Tutorial
This is my first very involved tutorial. It contains many layers.
Please DO NOT copy this tutorial or upload to another site.
You may download it to work off line or print if you wish.
All images used for this tutorial belong to me.
For this tutorial you will need:
PSP 7 ----you can get a free trail version here.
My sel files here. Unzip them to where ever you keep your sel files.
My imageshere. Unzip and open in PSP
Ok, get a nice cold drink and lets get started.
Open a new image 555 x 400
1. add a new layer, name it under carriage.
Selections/Load from Disk/undercarriage.sel
Flood fill with #924334
We will use the same red throughout.
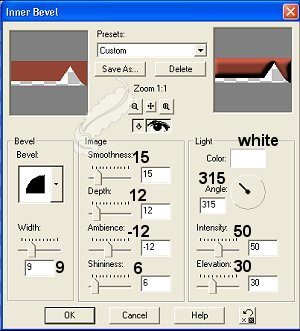
Effects/3d/inner bevel with these settings.
Save these settings for use during the entire tutorial.
2. New Layer named main body
Selections/Load from Disk/mainbody.sel
Flood fill with red
Same inner bevel
3. New Layer named seat
Selections/Load from Disk/seat.sel
flood fill black
4. New Layer named rear fender inside.
Selections/Load from Disk/rearfenderinside.sel
Flood fill with red
5. New Layer named fender outside
Selections/Load from Disk/rearfenderout.sel
Flood fill with red
Apply inner bevel
6. New Layer named toolbox.
Selections/Load from Disk/toolbox.sel
Flood fill with red
Apply inner bevel
7. New Layer named front fork
Selections/Load from Disk/frontfork.sel
Flood fill with red
Apply inner bevel
8. New Layer named rear tire tread
Selections/Load from Disk/reartiretread.sel
Flood fill black
Effects/noise/add 10% uniform
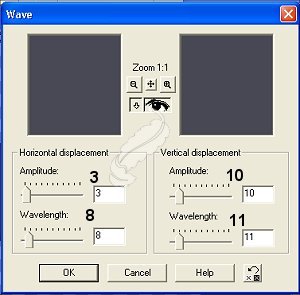
Effects/geometric/wave with these settings.
9. New Layer named rear tire
Selections/Load from Disk/reartire.sel
Flood fill black
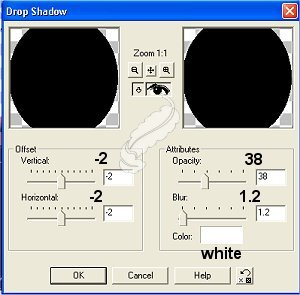
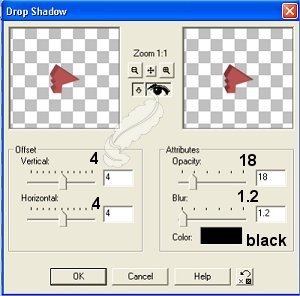
Effects/3d/drop shadow with these settings
10. New Layer named rear wheel.
Selections/Load from Disk/rearwheel.sel
Flood Fill with #7D7D7D
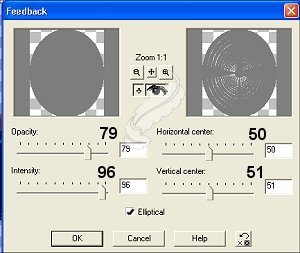
Effects/reflections/feedback with these settings
Keep selected and go to Selection/Modify/Contract by 15
Flood fill red
Deselect
11. Hide all layers except rear wheel, rear tire and rear tire tread.
Layers/merge visible.
Rename rear tire
Open up all layers again.
12. Right click on tire layer and duplicate layer.
With mover tool, move tire toward front of tractor a short distance.
Layers arrange and send to bottom
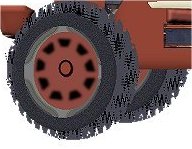
Position rear tire as shown in picture.
13.New Layer named front.
Selections/Load from Disk/front.sel
Flood fill red
Apply same inner bevel
14.New Layer named Bottom Bar
Selections/Load from Disk/bottombar.sel
Flood fill red
Apply inner bevel
15. New Layer named Tank
Selections/Load from Disk/tank.sel
Flood fill red
Apply inner bevel
16. New Layer named front tire.
Selections/Load from Disk/fronttire.sel
Flood fill black
Invert selection
Effects/3d/drop shadow with these settings

Effects/3d/drop shadow and change to +4 and +4
17. On same layer, Selections/Load from Disk/frontwheel.sel
Flood fill with red.
Deselect.
18. Right click on front tire layer and duplicate.
Move slightly up and toward front of tractor.
Layers/arrange/send to bottom
19. Make sure you are on the top layer.
Make new layer named tire rim holes.
Selections/Load from Disk/tirerimholes.sel
Flood fill black.
Deselect
Effects/blur/gausianblur at 1.75
20. New Layer named White trim.
Selections/Load from Disk/whitetrim.sel
Flood fill with #DFDCBD
Apply inner bevel.
21. New Layer named steering wheel hub.
Selections/Load from Disk/steeringwheelhub.sel
Flood fill red
Invert selections.
Effects/3d/dropshadow and apply settings below.
Selections/none
22. Make new layer named images.
Copy steering wheel, Paste as a new selection to tractor aligning up with the steering wheel hub.

Copy Fender Lights and past as a new selection to tractor in position under rear fender.

Copy engine and paste as a new selection to tractor

Keep selected and go to Colors/Adjust/brightness and contrast.
set brightness to 41 and contrast to 22
Copy box and paste as a new selection to tractor

Copy battery and paste as a new selection to tractor behind the engine.

23. New Layer named wheel hubs.
Make your forground color black and your background null.
Use preset shapes tool/eclipse/line width 3
draw a small circle in the center of the back wheel
Edit copy, edit paste to front wheel
Selections/None
Effects/3d/inner bevel
24. New Layer named exhaust
Selections/Load from Disk/innerexhaust.sel
Flood fill with #7D7D7D
Apply the inner bevel
On Same layer, Selections/Load from Disk/outerexhaust.sel
Flood fill with the same gray.
Apply the inner bevel
Selections none.
Layers/arrange/send to bottom
25. Take your drawing tool Color gray
Draw a small line with =2 at top of exhaust to make flapper.

Thank you for trying my tractor.
I hope you have enjoyed this tutorial as much as I have enjoyed making it.
If you have any questions, please e-mail me here Feathers3
©2002 by Nancy Hollinger
My index page is HERE
My tutorial index is HERE

